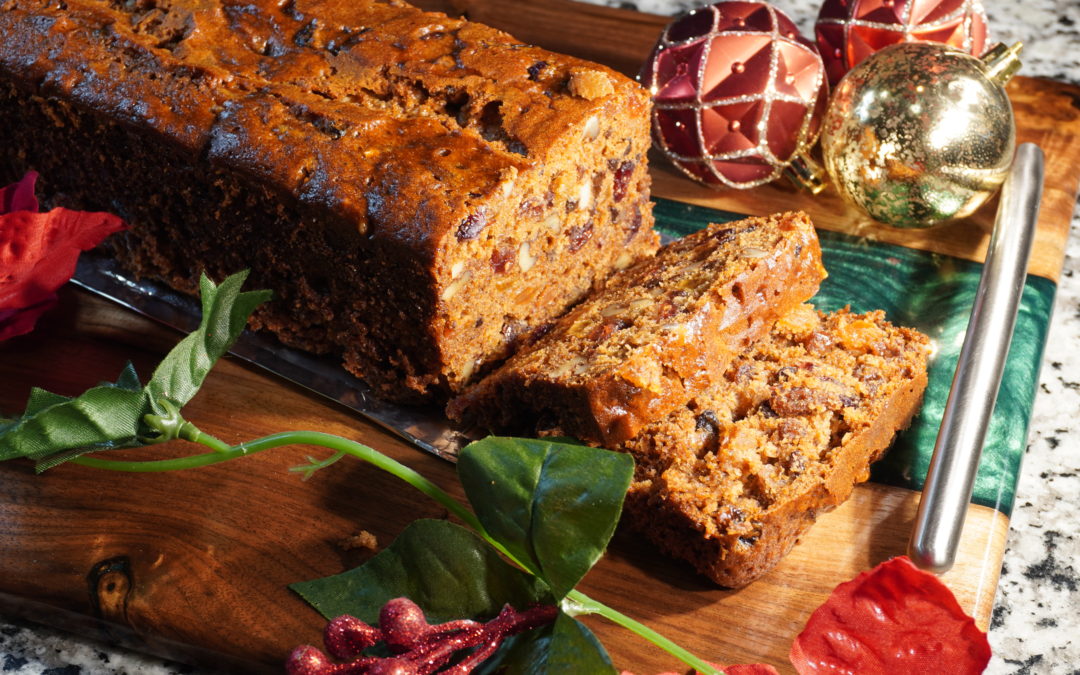
EASY FRUIT CAKE

EASY FRUIT CAKE

EASY FRUIT CAKE

Servings

12

Ready In:

1 hr 30 mins

ingredients


About this Recipe

By: Paromita

A no-soak, no wait fruit cake, still delicious and rich, a last minute Christmas option

My memory of Christmas is a cake, rich and loaded with fruits. I grew up in Kolkata, back then my father would get it from the store the day before Christmas.

I still sometimes do not have the rush before Christmas and one of the reasons why I love this cake so much. You do need some patience while baking it, but you do not have to soak the fruits beforehand and count the days.

Do not worry, it is still rich and delicious. And I bet you will get compliments from your family and friends.

boiling

You start with boiling the fruits with spices, this infuses the spices into the fruits without the need to soak them for days. Once the fruits are boiled, it is just mixing the fruits and flour and eggs.

sliced onions

Add as much dry fruits you like, however, these fruit cakes should be loaded with fruits and nuts. I keep the nuts a lot lesser than the fruits, to have some crunch but more richness from the fruits.

INGREDIENTS

  • Milk 1/2 cup
  • Water 1/2 cup
  • Butter 1/4 cup
  • Ground ginger 1 tsp
  • Ground cinnamon 1 tsp
  • Ground cloves 1/4 tsp
  • Ground nutmeg 1/4 tsp
  • Ground all spice 1/4 tsp
  • All purpose flour 1+1/2 cups
  • Eggs 2 large
  • Vanilla essence 1 tsp
  • Brown Sugar 1 cup packed
  • Golden raisins 1 cups
  • Dark raisins 1 cups
  • Dried cranberries 1/4 cup
  • Dried berries 1/4 cup
  • Black currant 1/4 cup
  • Chopped Walnuts 1/4 cup
  • Chopped Almonds 1/4 cup
  • Chopped Pecans. 1/4 cup
  • Baking soda 1 tsp

Step by Step Instructions

Step 1

Take a saucepan and add water and milk.
Add sugar, spices, salt and butter.

Step 2

Bring to a gentle boil and simmer for 5 minutes.
Cool the mix to room temperature.

Step 3

As the mix cools prepare a cake tin, I use a 9 inch loaf pan.

Grease the pan, layer the bottom with parchment paper. Also size and cut a parchment paper for covering the top.

Step 4

Wrap the cake tin with a wet cake strip. If you do not have one simply take a kitchen towel fold it, wet it and wrap around.

Step 5

Now add the eggs one at a time to the cake misture.
Add vanilla essence.

Step 6

Now slowly fold in the dry ingredients (flour and baking soda)
Slowly fold the flour till all the flour is incorporated.

Step 7

Pour into the cake tin and loosely cover with the parchment.

Step 8

Bake at 300 degrees for 1.5 – 2 hours.
Keep a close eye after 1 hour has passed.

Step 9

Cool in a wire rack for 15 minutes before removing from pan.

Your cake is ready to enjoy!

BENGALI SWEET TOMATO CHUTNEY

BENGALI SWEET TOMATO CHUTNEY

BENGALI SWEET TOMATO CHUTNEY

Servings

4

Ready In:

40 mins

dalerbora


About this Recipe

By: Paromita


A Bengali meal is incomplete without chutney. This simple version of the chutney is always in store in a Bengali home. One can also add ingredients and uplift this chutney into a ‘biyebari’ special (wedding menu special)

The best thing my mom leaves behind when she visits is a big glass bowl of this tomato chutney, made by her. It is the best. I try to follow her and barely reach her standards. Still making this chutney is special as it reminds me of being with her.

A simple dish to make this tomato chutney can make any meal special.

INGREDIENTS

  • Ripe Tomatoes – 500gms
  • Sugar – 150 gms
  • Salt – 1gm
  • Bhaja Moshla – 2gm
  • Mustard Oil – 5ml
  • Panch Phoron – 2gms
  • Ginger – 1inch

Step by Step Instructions

Step 1

Wash and cut the tomatoes into 1 inch cubes.

Step 2

Cut the ginger into juliennes.

Step 3

Heat mustard oil in a wok till it smokes.

Step 4

Heat oil in a pan on medium, you do not need to deep fry, about an inch of oil is good.

Step 5

Add panch phoron.

Once it splutters add tomatoes.

Step 6

Fry well then cover and cook for 5 minutes.

Step 7

Uncover and add raisins, stir well and cover again for 3 minutes.

Step 8

By now tomatoes should be mushy, add sugar and mix well

Step 9

Simmer on low till chutney reaches right consistency. 

This chutney should be slightly slurpy with some chunky tomatoes

Step 10

Finally remove from heat, add ginger and bhaja moshla

BENGALI DALER BORA (Bengali Lentil fritters)

BENGALI DALER BORA (Bengali Lentil fritters)

BENGALI DALER BORA (Bengali Lentil fritters)

Servings

4

Ready In:

15 mins

dalerbora


About this Recipe

By: Paromita


Bengali Daler Bora comes in many forms, some make it with masoor dal (red lentils), some with motor dal (bengali split peas) and some with cholar dal ( yellow split peas). Every Bengali household perhaps, has it’s own distinct recipe.

I was never a fan of daler bora – till I went away from home and started missing it!

Now I can proudly say you cannot take a Bengali away from her “daler bora”. The name sounds so simple and I bet, once you go through the recipe you will agree it is easy to make as well. However, it is a recipe that carries a cook’s uniqueness with it. What I mean is, following the exact same recipe if I make it, my mom makes it or my mom-in-law makes it, the “bora” tastes distinctly different and one can easily recognize the cook by eating the “bora”. Make sense?

Daler Bora is a great, no-fuss recipe for hot summer months. It perfectly pairs with simple dal and the most favourite combination for Bengali’s is with ‘panta bhat‘. On days when you do not feel like having anything too spicy or rich, when the sun outside simply makes it difficult to enjoy any food, a basic meal of rice, dal and daler bora will make your day! It does for me every. single. time.

topviewdalerbora

This particular recipe uses masoor dal and this is the one I make most of the time at home. Masoor dal is always available in a Bengali home and it is one of the quickest of many, as masoor dal takes very little soaking time.

Versions

Niramish or Vegan: Just add onion seeds, salt, and turmeric.

With ginger and garlic: The recipe here, add ginger, garlic to the mix.

With onions: Another variation is to add finely chopped onions to the mix.

sliced onions

INGREDIENTS

  • Masoor Dal – 100 gms
  • Ginger – 2 inch
  • Garlic – 10r 2 cloves
  • Salt – 2 tsp
  • Turmeric – a pinch
  • Onion seeds – 1 tsp
  • Green chillis – 1 or 2
  • Vegetable Oil – for frying

Step by Step Instructions

Step 1

Wash the dal well. Soak with 1 cup of water, ginger, garlic and green chillis.

Step 2

Soak for 2-3 hours. Grind the dal mix with enough water to make a smooth but thick paste.

Step 3

The paste should resemble cake batter, not runny. Add salt and beat well using your fingers or a spoon.

Step 4

Heat oil in a pan on medium, you do not need to deep fry, about an inch of oil is good.

Step 5

Now using your fingers (the traditional way) or a spoon add dollops of the dal mix to the hot oil,

Step 6

Fry on one side for 2 minutes, then flip and fry for another minute or 2.

Step 7

The boras should be golden brown when done

Drain and serve with rice and plain dal.

DIMER JHOL – BENGALI EGG CURRY

DIMER JHOL – BENGALI EGG CURRY

DIMER JHOL – BENGALI EGG CURRY

Servings

4

Ready In:

45 mins

ingredients


About this Recipe

By: Paromita

Bengalis always have fish in their menu, I think all of India knows that. However, there are days when a Bengali home is filled with the smell of Egg Curry being cooked.

I remember egg curry being made on days when we were bored of fish but specially on rainy days. For me it is an amazing option for a quick weekday stir up. It is spicy and delectable, all you need as a side is steamed rice.

Now living in Canada, me and my family enjoys Egg curry on days it is very cold and snowing, this spicy curry will warm you up. It is a delicious concoction of onions, tomatoes and spices.

boiling

Now the first things first, getting a well boiled and cleanly peeled egg. You can take a look at my other post here

For this recipe I usually boil the eggs with the potatoes. You know, a Bengali curry always has potatoes.

Sliced Onions or Onion paste

For any curry my first choice would be thinly sliced onions. Onion paste somewhat makes the curry lot like a thick soup. It does not render any texture if you use onion paste. So I would suggest giving a little extra effort in slicing the onions.

sliced onions

The important part of this curry, or any Indian curry for that matter, is to cook the ‘masala’ well to get the right colour and the right flavour. As you slowly cook the spices with onions and tomatoes, the spices release their aroma and everything comes together to give you this amazingly delicious curry.

masala

Ginger garlic paste or freshly crushed

I feel freshly crushing the ginger and garlic makes for a bold flavour. I have a small mortar and pestel and I try to use it as and when I can. However, there are of course days I opt for already made ginger-garlic paste. I do not prefer the store-bought ones as they have a lot of preservatives.

What I do is usually I will make it in bulk for the week ahead on a Sunday. I just peel and slice about 50 gms of ginger and garlic each and make a paste in my blender. The paste keeps pretty well for a week or even two. So why use the preservative-loaded ones.

INGREDIENTS

  • Eggs – 8
  • Potatoes – 3 medium
  • Onions – 2 medium
  • Tomatoes – 1 medium
  • Turmeric – 1 tsp
  • Cumin powder – 2 tsp
  • Coriander powder – 2tsp
  • Salt – 1 Tblsp
  • Garam masala – 1 tsp
  • Green Chillis – 3
  • Ginger – 2 inch
  • Garlic – 3 cloves
  • Cinnamon – 2 sticks
  • Cardamom – 4-5
  • Cloves – 4-5
  • Tomato paste – 1 tsp
  • Sugar – 2 tsp
  • Oil – 15 ml
  • Ghee / Clarified butter – 1 Tblsp (optional)

Step by Step Instructions

Step 1

Bring the potatoes and eggs to a boil and boil for 6 minutes

Transfer the eggs to cold water and peel

Step 2

Thinly slice the onions and dice the tomato

Slit the green chillis

Step 3

Smear the potatoes and eggs with turmeric and salt

In a wok or kadai heat some oil and fry the eggs on all sides

Step 4

Do the same for the potatoes

Step 5

Add rest of the oil to the same pan and temper the oil with the whole spices – cinnamon, cardamom and cloves

Add in the sliced onions and add some sugar

Step 6

Fry the onions till golden. Add in the ginger and garlic

Step 7

Fry for a minute and add in the tomatoes. 

Fry for a minute and add some salt and cover.

Step 8

In a bowl make a paste with water and the tomato paste and rest of the powdered spices.

Add the paste to the onions and tomatoes.

Step 9

Cook the mix for 7-8 minutes. Let it simmer and stir it every now and then.

Step 10

When everything looks all together, season with rest of the salt and sugar. Add 100-150 ml of water.

Step 11

Bring everything to a boil, add in the eggs and potatoes. Simmer the curry for 3-4 minutes.

Step 12

Finish with garam masala and chopped coriander. For an extra oomph you can add a tablespoon of ghee (clarified butter)

EGG SALAD SANDWICH

EGG SALAD SANDWICH

Servings

2

Ready In:

15 mins

ingredients


About this Recipe

By: Paromita

A special breakfast at my home, a good filling one.

Egg salad sandwiches are a hit in my home. My toddler is not really fond of boiled eggs, but when I give him this egg salad he hardly complains. This is such an easy but filling recipe and you can make so many variations as per your liking.

My husband likes it a bit spicy, so I use spicy mayo for the dressing, for me and my son I usually use greek yoghurt. You can add celery, green onions and even finely diced peppers.

Egg Salad

The egg salad is also a great options for picnics or finger food for drives. The hardest part is to get the eggs right, we need hard boiled eggs.

How to get hard-boiled eggs?

I use two methods just depending on my mood of the day. If I am already standing at the stove doing other things I use the

Stove-top Method :

  • Cover the eggs with cold water, make sure the eggs are submerged.
  • Put the eggs on boil, once the water starts boiling
  • Simmer the eggs for 6-7 minutes
  • Scoop the eggs out and put them in ice cold water

On days where I am just boiling eggs up ahead or I am just lazy

Instant Pot Method:

  • Add a cup of water to the instant pot
  • Place the trivet and carefully arrange the eggs
  • Now put the valve to sealing and pressure cook for 10 minutes
  • Allow natural release for 5 minutes and then release the pressure.
  • Get the eggs out and put them in ice cold water

Getting perfectly peeled eggs:

I have tried several tips and tricks to get perfectly peeled eggs. I think the best one that has worked so far is to put the eggs into ice-cold water as soon as they are done boiling. Also add some salt to the boiling water. This makes the shells pretty easy to peel and you get perfectly boiled and peeled eggs. There will be some hard ones, do not stress yourself, it’s an egg only at the end of the day.

sliced onions

Once you have peeled them there are 2 ways you can chop the eggs, use a fork, or use a egg slicer.

We are making this egg salad shine, so do not just stop at chopping the eggs and adding mayo. We need some other elements to add some character to our egg salad. Today I am using celery, pepper and lemon juice. If you prefer you can also add scallions or even shallots.

I also sometimes add some chopped coriander for freshness and to add a bit of Indian flavour.

INGREDIENTS

  • Hard boiled Eggs – 6
  • Spicy Mayo* – 2 Tblsp
  • Greek Yoghurt – 2 Tblsp
  • Celery – 1 stick
  • Pepper 1 tsp
  • Salt 1/2 tsp
  • Bread – 8 slices

Step by Step Instructions

Step 1

First we need to hard boil the eggs.

Once cooled and peeled, chop the eggs.

Step 2

Finely chop the celery and scallions ( also coriander if using)

.

Step 3

Now in a large bowl combine spicy mayo or greek yoghurt, celery, coriander, salt and pepper.

Combine well.

Step 4

Now add the eggs to the bowl and mix carefully.

Step 5

Toast the bread slices.

Step 6

Put a slice of bread and add 2 tablespoons full of the egg salad

Cover with the other slice.

Step 7

Slice from middle and serve.

*Spicy Mayo : You can buy spicy mayo from the store or use just plain mayo mixed with spiracha.

You can also use just plain mayo or replace all with greek yoghurt to keep it light.